
How not to build a PD Racer
By Justin Overton #567 "Cheyenne" (1ar)I've always loved boats, particularly sail boats. I always enjoyed studying about ancient sailors in school. So after I watched a couple of nautical movies (Master and Commander and White Squall) I started wondering how much it would cost to learn to sail. I shopped around for boats, classes, clothes. Unfortunately, my wife had a baby on the way and there was no way I could buy a boat. Just when I was about to give up, I ran across some plans for a one sheet skiff. I like tinkering, so I started researching about boat building. I figured if human ingenuity could allow people to create boats 7,000 years ago then I should be able to make something with a few power tools and some cheap lumber. Then I found the PD Racer website, and I was hooked. Unlike other boat building articles/plans I found, the PD Racer seems to be all about human ingenuity, experimentation, and embraces the fact that everything doesn't have to be perfect for a boat to float. So, I started to build a PD Racer. My wife figured it'd be another dead-end incomplete project. I know that if it weren't for the host of information on the PD Racer website, and the lighthearted approach to building I would have never finished this project. I decided to write this article for anyone else like me that really wants to try this, but doesn't thing he can. If I can build a boat, then anyone with half a brain can build one too.
So, what are my credentials to write an article about boat building? I have zero, zip, zelch experience in the following:
- Sailing
- Boating
- Woodworking with power tools other than a jigsaw
My first trip to home depot was on 5/7/2011. My wife gave me a budget of $150. I had to cut corners, I decided to only get what I needed to get started, I'd buy other materials as I needed them. I got out of home depot with three sheets of plywood, several 2x2's for the chines, TB II wood glue, PL Premium, some nails, and some sanding discs.
I had a screwgun, a circular saw, a miter saw, a jigsaw, and a handheld pneumatic sander, hammer, and numerous clamps at my disposal. I think that I could probably do it without the skill saw and miter saw if I had to, I would rather have had an orbit sander than the pneumatic sander any day. The sander was too fast, and ate the wood for breakfast. The disc also has a big plastic thing in the center, so it's hard to sand anything that's not the corner. The sand paper also bends back, so it tends to create a bevel as you sand and I found it difficult to sand evenly. I ended up doing very little sanding.
I did not have a safe way to split chine logs from 2x6's as described in The Simple 18 instructions, and I had a hard time finding any decent 1x2's, so I settled for using 2x2's for the chines. The only complaint I have about the 2x2's is that they are much harder to clamp. Small clamps will get over them, but you have to pull them back pretty far. This is a good time to say, you cannot have too many clamps. I found a thing of 16 small clamps on sale at walmart for $7, I don't know what they normally cost.
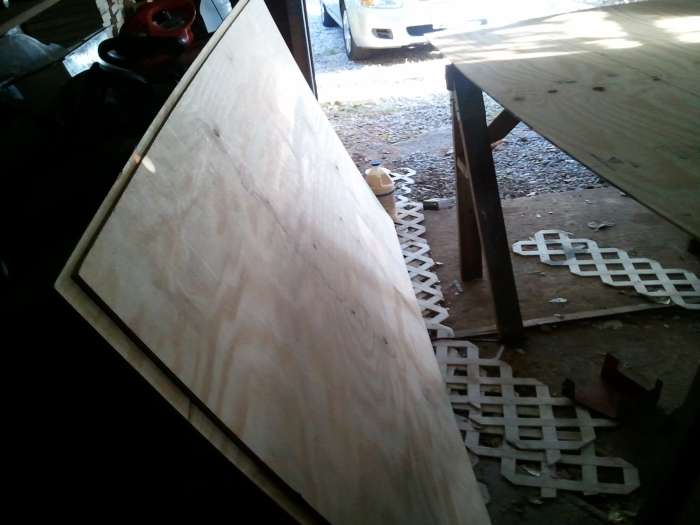
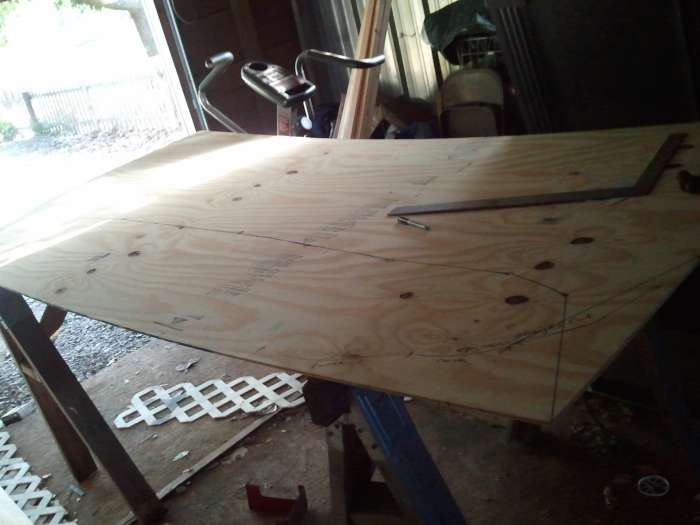
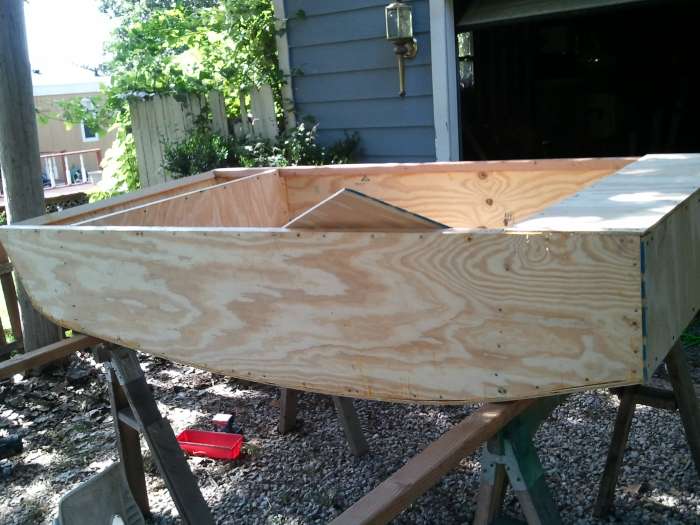
My brother is a carpenter. We're not really in touch other than on facebook, but he did tell me to measure twice and a 1/16" to my cuts. The first cut I made was to cutout the sides. I went to the page about how to properly measure a class-legal hull and placed dots at the proper points as if measured from the bottom of the boat. At first I plotted them from the edge of the plywood, but then decided I'd like to keep the straight edge and cut the curve on the inside... so I had to do some math to plot the dots so they'd be closer toward the center. If the first point is 6" from the bottom and you have an 18" hull, then it's 12" from the top. Just subtract from 18 to get the distance from the top. I put tall thumbtacks in each dot, and then connected the dots with a rope. I then took a sharpie and drew a line along the rope. I got a very ugly curve, but it was enough to follow with a jigsaw. Notice the big square on the table. That tool was extremely valuable. However, when using it don't get in a hurry. I actually did heed my brother's warning and measured twice. The square I used has measurements on the inside of the L and on the outside of the L. Depending on what you're measuring, using the inside or outside can come in handy. However, if you intended to use the outside measurement and accidentally used the inside measurement, you'll be off by a long shot. When I measured a second time, I found my mistakes.
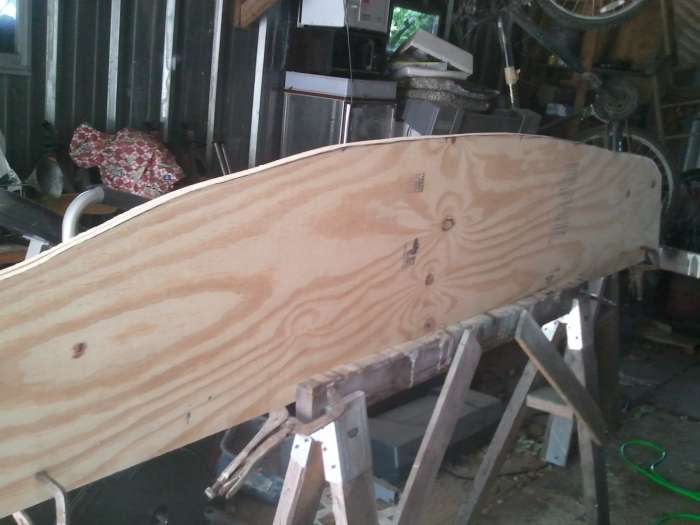
Once I got the sides cut out, I clamped them together by sandwiching them between two saw-horses and then clamping the saw horses together. Then I attempted to sand them both together to ensure both had the same curve. The pneumatic sander I had available has a big plastic ring in the middle of the discs, and the sandpaper tends to bend backward when it contacts the wood. It also removed a lot of wood, very quickly. So I think I made a few mistakes there. I plan on getting an orbital sander or something for the next shot. Something that can lay flat over both pieces at once, that won't unintentionally angle/bevel.
I don't have any pictures of attaching the chines. However, I'm pretty sure I did it in a very poor manner. I cut probably 5 or 6 sections out of each 2x2 and used the miter saw to try to cut an angle so that they'd follow the curve. Unfortunately, the angles didn't come out quite as nice as I'd have liked and there were some gaps that I had to fill in. In the future I plan on trying to use a 1x2 or even splitting chines from a 2x6 to try to curve a single piece around the side. It might have gone better even if I had an 8' 2x6 and just clamped it to the side then cut around it with a jigsaw.
I didn't get to work on the boat again until 5/13/2011. I managed to get the hull into a 3dish look, and checked over how everything was going to fit together.
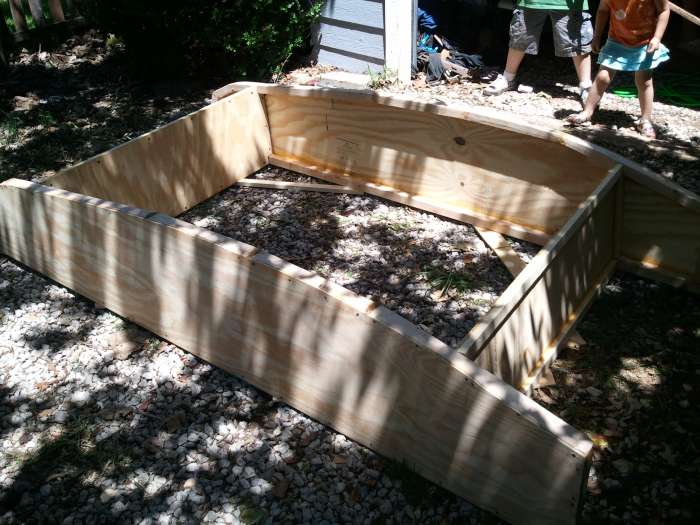
A few hour later the boat went fully 3d. Getting the bottom on did not go as smoothly as I had hoped. I had some tolerance issues. The sides were not attached fully square. That is, the bow of the boat was 4' from end to end but the stern was not. When corrected, the stern was 4' from end to end and the bow was not. My father-in-law helped me get the bottom on, and we basically got the stern 4' end to end, then sunk some screws in, pressed in on the sides, put more screws in, and made our way up to the bow. Unfortunately this applied some torque to the bottom sheet as we started getting closer to the bow. I think that the sheet started to shear slightly or warp. It wasn't noticeable, but there was so much tension that we couldn't get the last 4" of the bottom sheet to follow the curve on its own. If I could do it over again, I would have pulled the screws out, and fixed the bulkheads. However, we live in Texas, and it gets hot. We were hot, tired, and hungry. So we sawed off the 4", I added a chine along the bottom, and we attached it that way. I was too frustrated to take a picture of this particular issue, however you can see where the problem is in some of the other pictures.
I don't have any pictures of my attempt at fiber glassing the boat. However I did try. I bought some latex gloves and a fiberglass kit from home depot. I mixed the resin in an old coffee can. You'll find several other articles on the web that say to mix a small amount, as you can always make more later. So I'm going to say mix a small amount as you can always make more later. The first batch hardened literally between sheets. I dipped on sheet of fabric in the resin, put it on the boat, dipped another sheet, and the stuff was already just a bit harder than jello. I made another batch and continued. The resin literally ate through my latex gloves. I don't know what the proper gloves to use are. I got another pair, then finished as quickly as possible. My father-in-law said that resin was the way to go, he's seen it used on cars, motorboats, etc. So I used the resin. It was gooey, hard to mix properly, and impossible to get off my skin. You cannot wash it off with soap and water. I think I ended up washing my hands in paint-thinner or some such. It's probably not a good idea to play with harsh chemicals and use more harsh chemicals to remove them. If you plan to do fiberglass, I'd probably try epoxy. I didn't want to have to wait for something in the mail and I paid for it all right.
Now, the next issue with my fiberglass job stems from the fact that I know nothing about boats, boat building, woodworking, or anything properly manly and macho. When the instructions said fiberglass the chines, I didn't know what that meant. I actually didn't know what a chine is. I'm still not quite sure that I do. Wikipedia says it's a sharp angle in the hull of a boat. I'm not sure if you're supposed to fiberglass the inside chines, outside chines, or both. I fiber glassed the outside edges of the boat and I got a LOT of air bubbles in there. I ended up having to use scissors to cut some of them down to size, and filled them with PL, wood glue, or whatever other sealer type stuff was handy. I would recommend that if you fiberglass, you use several short strips rather than a few long strips. I also had a fiberglass sheet rather than a roll. So I had to cut my strips. When I tried to spread the strip, some of the fibers came loose. They got all over the place. Try to avoid air bubbles. Also, my boat was sitting right-side-up. Gravity works against you in the formation of air bubbles. I'd try and flip the boat upside down first and it may help. I did not apply any fiberglass to the inside of the boat, I got too frustrated and decided to just put PL along every edge and crevice instead.
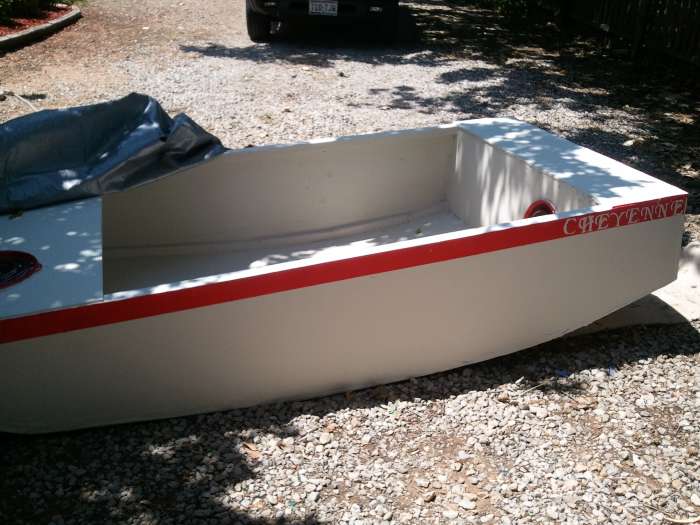
I didn't get a chance to work on the boat for about a month. It wasn't until 6/11/2011 that I got to get out and start painting. I hadn't cut the holes into the air boxes yet since I wasn't sure how I planned on sealing them (tupperware, paint can lid, actual deckplate) so I didn't want to cut a hole until I knew what I was going to do. I had a very good image of what I wanted the boat to look like. At this point, I started telling everyone in my family that I had a yacht. I wanted to paint the entire boat white with a 3" red stripe along the top perimeter and the name of the boat in white letters on top of the stripe. Simple, clean, and elegant. I painted the entire exterior (except the bottom) with a paint brush. I figured it'd be less mess than messing with a roller, pan, etc. I did 3 coats of paint. When it dried I fippled it over to do the bottom and used a roller. I did 3 coats in half the time. If you want to do something that's somewhat relaxing and zen-like, then use a paintbrush. If you want to get it painted quick, use a roller. I didn't bother trying to clean the roller, I just threw it away.
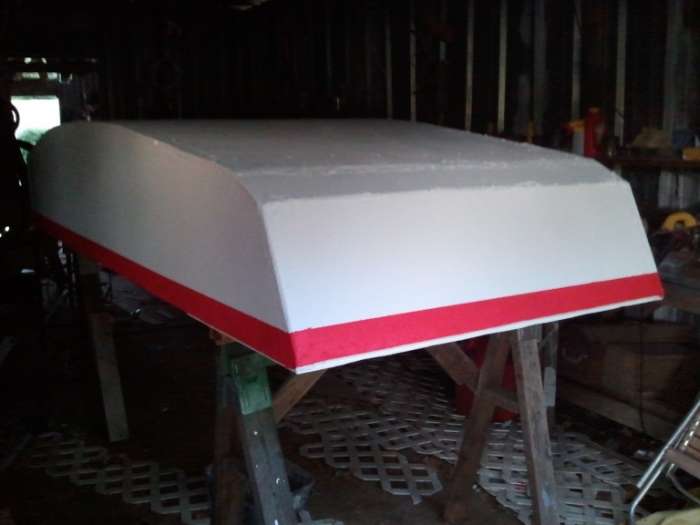
In the painted picture you can easily see the issue where I had to cut the bottom sheet to make the curve. It's wavy because the fiberglass has airbubbles. I don't think it's going to win any races, but I don't really care. She may be ugly, but she's my baby. (Note: Only parents may call their baby ugly. You can't call someone else's baby ugly to their face.)
On 6/17/2011 I got to work on her again. I bought a set of two rubbermaid tupperware bowls, with 10" lids, for about $5 at walmart. I cut the tops off of the bowls and used the bowl's lip and lid for the deckplates. I didn't want to try to figure out how to lineup the forward hole with the mast, so I just put it on top. The other I put on the side, mostly because the top of the rear box wasn't wide enough. I didn't paint the interior because I didn't want to saw on what I'd already painted, but I had painted the top, so I just pit the bullet and repainted the top after installing the deck plate.
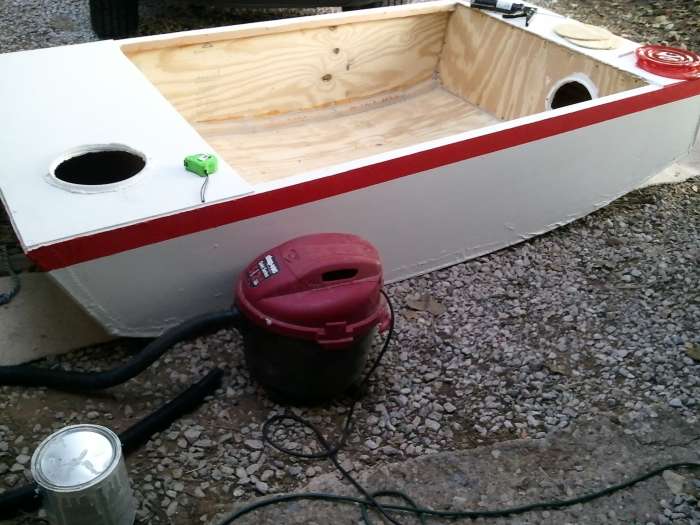
I am extremely happy with how the deck plates turned out. I put some caulking along the perimiter and after it dried tested it out. They kind of feel like subwoofers, but they match the paint-job and seem like they'll work rather well. You'll notice a shopvac in the picture. After a whole week, spiders had moved in. I don't mean just a couple of spiders. Every corner of the interior of that boat had some sort of web. I also found a couple of stray fire ants in the boat. I'm not sure what they wanted, maybe the wood glue smells like food to them? Anyhow, I vacuumed it out and used a damp rag to cleanup all the dust so I could paint the interior. I'll also take this moment to say, don't paint your boat under a tree. It was only the interior, so I didn't care about a bit of tree gunk getting in my paint.
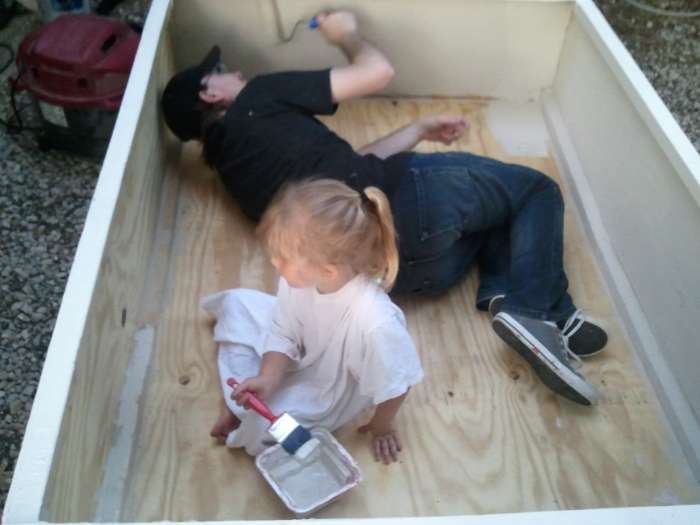
I then had some help painting the interior from my 4 year old niece. She'd been begging to help me paint the boat ever since she asked what I was doing with all the wood and I told her I was building a boat.

I used a stencil from Hobby Lobby to paint the name of the boat. I named it Cheyenne my 7 month old daughter. Here are some pictures of the painted boat:
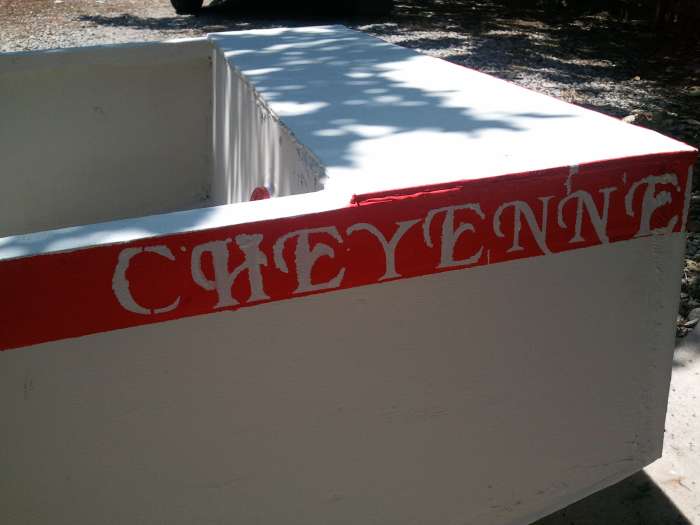
I'd planned on painting the hull number on there too, but the stencil didn't have any numbers and I don't want to mix fonts.
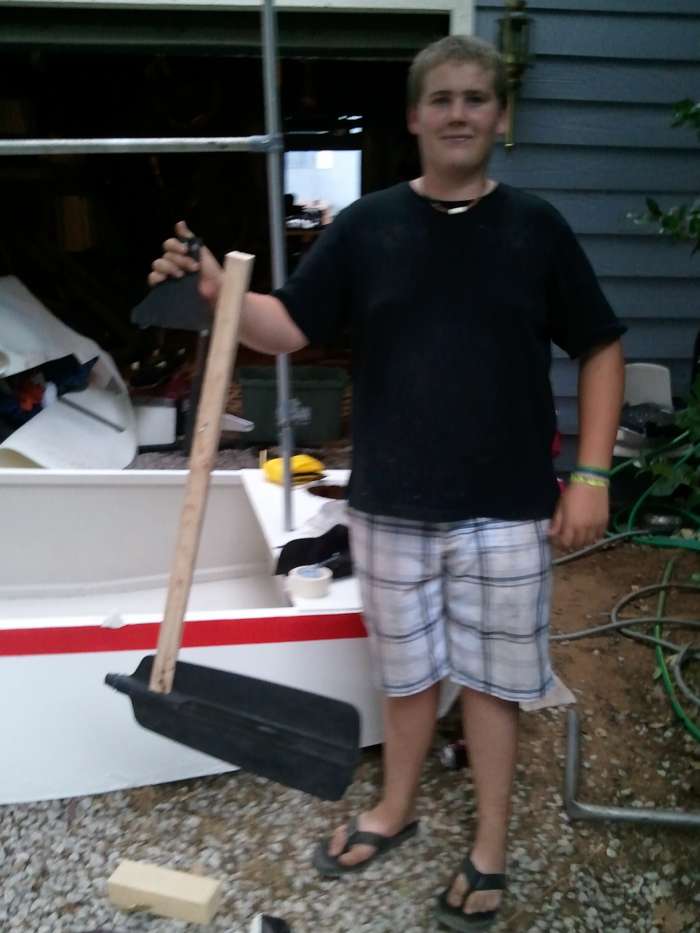
One of my wife's young cousin's built me a rudder from an old oar, a piece of scrap wood, and an old miter saw mechanism. The saw mechanism is some portion of the thing that the saw uses to go up and down. So basically it's a nice kick-up hinge for if the rudder hits a rock. He attached the oar's fin to a piece of scrap wood, the wood to a door hinge, and the other end of the door hinge to the saw mechanism. So I have a stick shooting up to attach a tiller that can yaw side to side and a saw mechanism that can pitch up and down. The whole thing is so heavy that I can't imagine needing to add anything to it to weigh it down. I have my doubts about whether or not this rudder will work. I'll be sure to post about how it does once I have a chance to test it.
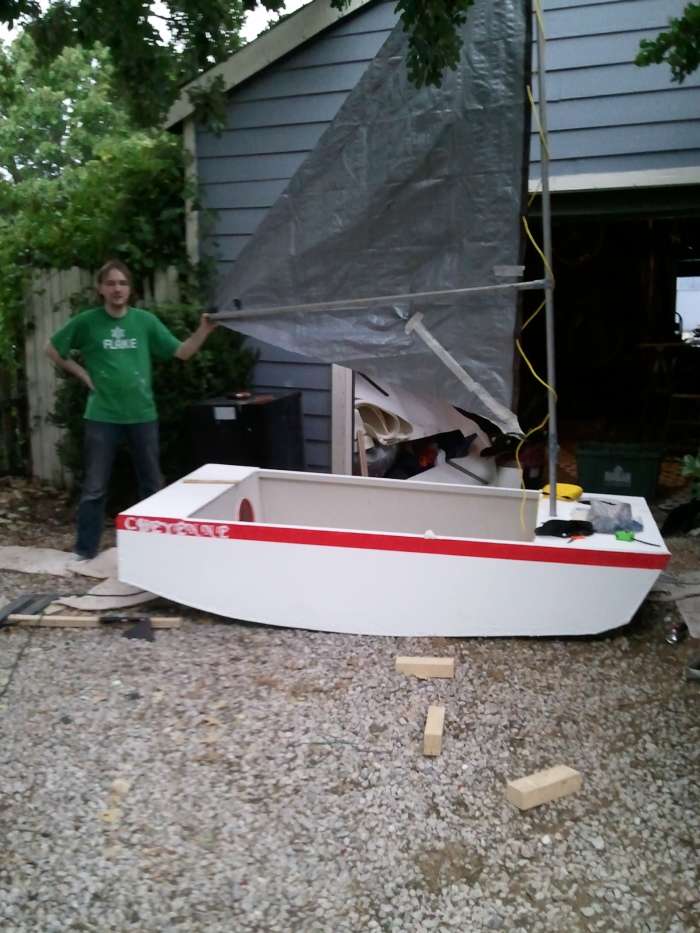
Finally, I got to mess with the sail! So my father-in-law has a whole bunch of chain-link-fence poles laying around. I took one of them, it was only 9' 8" tall. I had bought a 8'x10' tarp, which would make a rather small sail in comparison to what I've seen on the PD Racer site. So I cut another piece of pipe and used the normal chain link fence clamps to join them together to make a 12' mast. After considering the 18" depth of the hull there's just enough room for a 10' sail. I used another normal chain link L shaped clamp to attach another piece of pipe to the mast about 3' from the bottom of the luff to make the boom. The clamps are strong, but simple. They just use a nut and bolt to tighten. I plan on keeping a 1/2" wrench in one of the airboxes so I can easily lossen the clamp and remove the boom for transport & storage. These poles are light aluminum, but are very strong. I felt a lot better about using them than trying to cut something from a 2x4. I may decide to buy a bigger tarp to make a larger sail, and if I do it'll be easy to make a 16' mast from a couple of pieces of pipe.
I decided to make a Leg-O-Mutton sail. I put one dart in it, and used tape to hold it down. I plan on adjusting it a bit before I sew it in. Hopefully the tape will hold. If it doesn't, oh well.
The boat was completely finished by the end of 6/18/2011, and I had planned on taking the boat out on my first father's day. However, the weather did not cooperate. There was a red flag warning due to high winds with 40mph gusts. I went out on a small tin fishing boat just a couple of months earlier on a very windy day and remember the wind threw it straight into some rocks right after we got it off the trailer. The thought of that happening to my little boat made my stomach sink. So I decided to play it safe and wait for a calmer day for the maiden voyage. I plan to update this article with details of the first trip as soon as I can.
I planned on bringing a battery powered drill with me to attach the rudder just before launch, just so I don't risk damaging it during transport. I also planned on rigging a quick daggerboard just before leaving for the trip. Though now it looks like I'll have time to come up with a better solution.
I look forward to hearing feedback from other duckers. See ya on the water.
Justin Overton