
Design Your Puddle Duck
Designing sailboats is pretty easy. I have been to MANY messabouts, seen hundreds of boats that were built by amateurs. Many were modified from an existing design, many were designed from scratch, and every single one of them "worked" adequately. Some people would build a boat purely by guessing, and others would use available methods for calculating how big and where to put various parts. Below I describe a couple of those methods for making a good guess at configuring your duck.
And yes I meant what I said, sailboat designing is just guessing and you won't find out how well she works till you try her out. Even the people designing America's Cup boats admit this, and is evident when they launch new designs and they break - some of those breakages cost millions of dollars in hardware. If it was an exact science, you would never see breakages like that.
A really good sailboat can only emerge from real world testing & improvements.
What Is The Purpose Of A Keel (daggerboard, leeboard, centerboard etc)
The Short Answer:
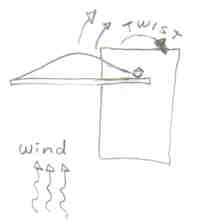
The reason a boat goes forward, is the exchange and conversion of force between the sail and your keel. The wind blows, and your sail catches that force. If all you had was a sail, then you would simply go straight down wind. We want make the boat go forward, and that is what the leeboard does (or other keel), it converts that force into forward motion.
The Long Answer:
The sail and everything above the water line will catch the wind in various ways. If you have a flat sail, pretty much all it does it deflect the wind. If you have a sail with an airfoil shaped in it, and you are using the sail in a way that creates laminar flow with the wind, the forward side of the sail generates lift in addition to deflection force. All of this together is called "Effort", and if you figure the balance point of that effort, you end up with your Center of Effort, usually referred to as "CE".
Everything below the water line will interact with the water in some way, and create what is called "Resistance". Lets imagine that the boat is perpendicular to the wind. One of the neat things about box shaped boats is that the side of the hull also makes a pretty good amount of resistance by itself. That 90 degree chine will bite the water pretty good. Now lets put the leeboard down, and you have a blade in the water with a lot of area to it, that makes even more resistance. If you add all of that resistance up, and figure it's balance point, that is called the Center Of Lateral Resistance, usually referred to as "CLR".
What makes your boat go forward is simple: "effort" is "resisted", and the interaction makes your boat move in a forward direction. Now that you are moving, your boat will be making it's way through a flow of force and resistance. You can make adjustments to improve your speed or direction, but you can't really make your boat do it, you have to utilize that flow.
The subject of how to utilize the flow of forces is huge, and it really is more of an art form that is supported by science. At the most basic level you really have to feel it in your body to understand it. You feel how the boat is moving, you look at various indicators like the shape of the sail, the little strings we attach to them, the water around your boat, and many other indicators. Sailors have created all sorts of other tools for making observations, but when it comes down to it, they are just inputs, and you interact with the flow based on how you feel it. That a big reason why sailing is so fun.
Where To Place Your Leeboard or Centerboard

Short Answer:
The leeboard is placed just a little bit forward of the center of the sail.
Long Answer:
It is a balancing act. However just like any balancing act, if you have too much weight on one side of a pivot, it will upset the other side.
Very similar to a kids teeter totter see-saw. If you have a really big kid on one side, and a small kid on the other, then the little kid stays in the air and the big kid sits on the ground. If both are about the same, then the load is evenly balanced on the pivot point, and it is easy for them to go up and down.
The reason the leeboard is placed just a little forward of the CE, is because we almost never have the sail in the middle of the boat. Usually the sail is off one side or the other, which has the effect of moving that center of effort a little further forward.
Jim Michalak has a great essay explaining these concepts including how to calculate sail size and locate the exact center of the area in his book Boat Building For Beginners And Beyond
Keel to Rudder Distance
Because our boats are so short, you have to also take into consideration the distance from your leeboard to the rudder. The further apart they are, the more of a mechanical advantage your rudder will have. I have found that having the leeboard board 4 feet from the stern seems to work great.
If the leeboard is closer to the stern, like around 3 feet, then sometimes the rudder will loose effectiveness on certain points of sail, such as running down wind or deep reaching off the wind. The lever arm of the huge sails we typically use is just too powerful.
Put It All Together
Lets build a duck. Start by creating a scale representation of a duck hull. I prefer using pencil, paper and an engineering scale. Others use CAD software (computer drafting programs), or make models from various materials like cardboard or card stock.
A really great material for models is 1/8" plywood (door skin). To shape it, you roughly cut near the line, then use a heavy grit sandpaper to get the final shape of the piece you want. Then you can glue the parts together with Titebond II glue. To hold them in place, use masking tape or other means. After a seam is dried, run an extra bead of TB2 down the inside and outside edges. Paint, and after it is dry, launch your model boat in your swimming pool, or better yet your koi pond. Some people will first acquire an action figure or architect's model, and build to a scale which matches that doll. If you really want to be interesting, sand the face off the figure and glue a picture of your face on the head of the doll. .... Enough digressing, back to the subject.
Pick A Sail and Locate It On The Hull
The most common duck sail is a Leg-o-mutton sprit, so we are going to use that one.
Locate The Mast
For this hull, I am going to put the mast about 12" from the bow. Thats a little further forward than the Simple 18 does.
Locate The Leeboard
We know to locate the leeboard, we need to find the center of the sail. The center of a LOM is 29" back from the luff. Add 12" for the distance from the luff to the bow, and we discover the CE is 41" aft of the bow. I want my leeboard just a little forward of that, so I am going to place my pivot bolt about 38" aft of the bow.
Check Leeboard To Rudder Distance
Remember that we don't want those too close to each other. Lets say the hull is 18" tall, that means it is a full 96" long. Our leeboard pivot is 38" from the bow, that means it is 58" from the stern where the rudder is. Great, plenty of distance.
Thats pretty much it
There you go, that is it for the complicated parts. You'll need all the other details like figure where to put your emergency flotation, what kind of rudder to use, and all the other stuff, but that seems easy for the average person to intuitively understand.
There are much more precise formulas that you can employ, boat designers have been guessing, testing and publishing all sorts of different methods ever since the first boat was made. If you are interested, there are many books available about boat design & configuration from your library. Some of the books are good, some not so, and others just fluff. If you really do want to learn more, I'd suggest building your basic duck hull and get out there on the water so as you read about various theories, you can test them on your duck. Thats one of the nice things about our class, we all use the same hull so you don't have to design the hull, and all the other parts are easy to change & move around.
Now go build your hull, try her out and see how she works.
Make adjustments as needed.